Your orchid looked beautiful for weeks, maybe even months. Then one flower dropped, another followed, and suddenly you were left with a bare stem and a pot of green leaves. It is easy to wonder whether the show is over for good.
Fortunately, most healthy orchids can flower again. The trick is understanding what your plant needs between blooming cycles rather than treating those fallen flowers as a sign of failure.
If you want to learn how to get orchids to rebloom, start with three essentials: enough light, healthy roots, and the right temperature changes. For common moth orchids, a slightly cooler nighttime environment can provide the extra signal that encourages a new flower spike.
You don’t need a greenhouse, expensive equipment, or a large gardening space. A bright apartment window, a well-draining pot, and a little patience can go a long way.
I’ll walk you through what to do after the last flower falls, how to encourage new buds, and which common mistakes can keep an otherwise healthy orchid from blooming. Most importantly, you’ll learn how to recognize progress before the first flower appears.

1. Check What Kind of Orchid You Have
Before changing your orchid’s care routine, make sure you know which kind you are growing.
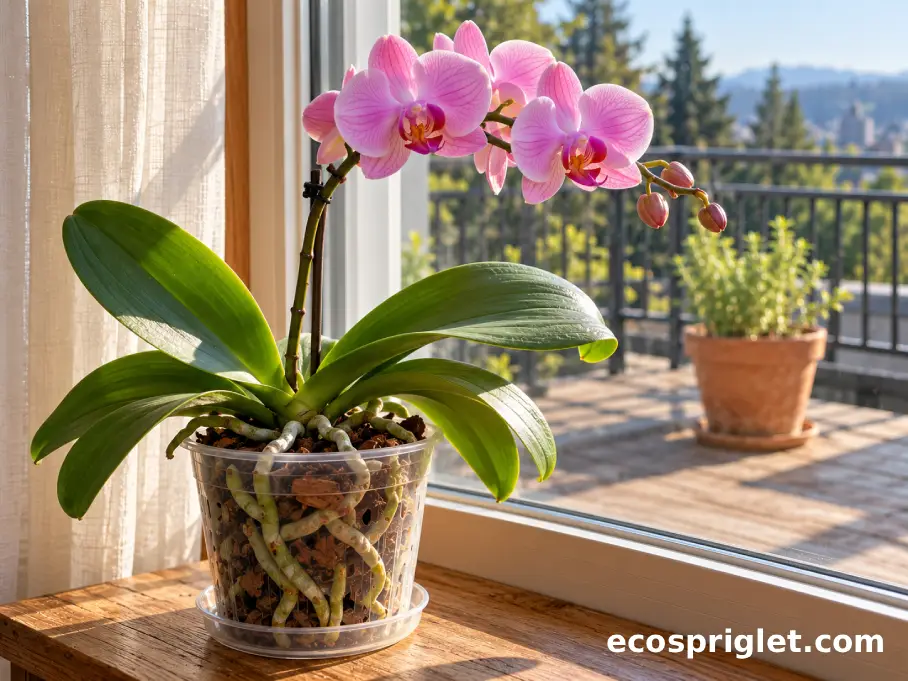
Most orchids sold in supermarkets, home improvement stores, and garden centers are Phalaenopsis orchids, commonly called moth orchids. They have broad, leathery leaves, thick roots, and arching flower stems carrying white, pink, purple, or patterned blooms.
These are excellent indoor plants because they tolerate ordinary household conditions and can rebloom with relatively simple care.
Other orchids, including Cattleya, Dendrobium, and Oncidium, may need different light levels, seasonal temperatures, or rest periods. The instructions below focus mainly on Phalaenopsis.
Make Sure Your Orchid Is Healthy Enough to Bloom
Look for firm green leaves, healthy roots, and signs of new growth. Roots inside a clear pot may appear green when moist and silvery when drier. They should generally feel firm rather than hollow or mushy.
If your orchid has two or more healthy leaves, functioning roots, and no serious signs of disease, it may simply be between flowering cycles.
However, if the leaves are collapsing or most roots are brown and soft, concentrate on recovery before encouraging flowers. Producing a new spike requires energy that a struggling plant may not have.
The American Orchid Society emphasizes the importance of healthy roots, suitable light, and consistent care for successful Phalaenopsis flowering.
2. Decide What to Do With the Bare Flower Spike
One of the first questions people ask when their orchid blooms fall off is whether they should cut the stem.
The answer depends on the color and condition of the flower spike.
A green spike may still contain dormant buds capable of producing a side branch. A completely brown, dry spike has finished its work and can be removed.
Three Ways to Handle the Old Spike
- If the spike is green: On a healthy Phalaenopsis, you can trim approximately 1/4–1/2 inch above the second healthy node from the base. A side branch may develop, although it is not guaranteed.
- If the spike is brown and dry: Cut it approximately 1/2 inch above its base using clean, sharp pruning shears. Avoid damaging the leaves or crown.
- If the plant looks weak: Consider removing the entire spike, even if it is green, so the orchid can focus on root and leaf growth instead of another immediate flowering attempt.
A node is the small raised joint along the stem, often covered by a thin, papery bract. It is where a dormant bud may produce new growth.
I remember being reluctant to trim the first orchid that stopped flowering in my apartment. The stem was still green, and cutting it felt like throwing away progress. Eventually, I learned that leaving a healthy spike and removing a spent one are both reasonable choices. What matters more is the condition of the plant.
According to the Royal Horticultural Society, cutting above a lower healthy node can encourage a secondary flowering shoot.
Forcing repeated flowering on a weak orchid is rarely worth it. Healthy roots and leaves are the foundation of future blooms.

3. Move Your Orchid Into Better Light
If your orchid keeps growing leaves but refuses to produce flowers, light is one of the first things I would investigate.
Phalaenopsis orchids do not require the intense sunlight that tomatoes or many flowering balcony plants need. However, they need more light than a dim shelf in the middle of a room usually provides.
An east-facing window is often ideal because it delivers gentle morning sunlight. A west-facing window can also work, although a sheer curtain may be necessary during hot summer afternoons.
South-facing windows provide useful light in winter, particularly in cloudy climates, but may need filtering during summer.
How to Tell Whether Your Orchid Gets Enough Light
Leaves offer useful clues. Medium green leaves are generally encouraging. Very dark, stiff green leaves can indicate insufficient light, particularly when the plant is otherwise healthy but never flowers.
Yellowing or bleached areas, reddish leaf margins, and dry scorched patches may indicate excessive sunlight.
For a simple apartment test, hold your hand approximately 12 inches above the leaves during the brightest part of the day. A soft, slightly fuzzy shadow suggests a useful light level for many moth orchids. A sharp, dark shadow may mean the light is too intense.
Do not move an orchid straight from a dim room into strong afternoon sunlight. Increase exposure gradually and watch the leaves for stress.
If you only have a north-facing window or your apartment receives limited winter daylight, consider a small LED grow light. Position it according to the fixture’s instructions; many orchid setups use lights approximately 12–24 inches above the foliage.
4. Use Cooler Nights to Encourage a New Flower Spike
Here is the step that often makes the difference between a healthy orchid that only grows leaves and one that produces another flower spike.
Many Phalaenopsis orchids respond to a change between daytime and nighttime temperatures. In their growing cycle, cooler nights can help signal that conditions are right for flowering.
According to the Royal Horticultural Society, providing a temperature decrease of approximately 8°F for about a month can help encourage flowering in a healthy moth orchid.
Try This Apartment-Friendly Temperature Routine
For approximately three to four weeks, aim for daytime temperatures around 70–80°F and nighttime temperatures near 60–65°F. A difference of roughly 8–10°F between day and night is a useful target. These are practical starting ranges rather than a guarantee, and different hybrids may respond differently.
A bright room that naturally cools at night is often enough. You may be able to achieve this by adjusting your thermostat slightly or moving the orchid to a cooler bedroom.
A spot near a closed window may also provide a gentle nighttime temperature drop. Keep the leaves from pressing against cold glass, and avoid freezing drafts.
Do not put a moth orchid outside on a cold balcony to force flowering. Keeping nighttime temperatures at or above approximately 60°F is the safer approach for common household Phalaenopsis hybrids.
Once you notice a developing flower spike, return the orchid to a stable, comfortable location. Sudden temperature swings can stress developing buds.
One advantage of apartment gardening is that a small thermometer can reveal useful differences between rooms. I would test the temperature for two or three evenings before moving the plant permanently.

5. Keep the Roots Hydrated Without Leaving Them Soggy
Healthy roots make reblooming possible, but watering problems are one of the easiest ways to weaken them.
Unlike plants growing in ordinary potting soil, Phalaenopsis orchids naturally grow with their roots exposed to air. A coarse orchid bark mix helps imitate those airy conditions inside a container.
The goal is to keep the roots hydrated while allowing air to circulate around them.
Use the Roots and Bark as Watering Clues
- Silvery roots and nearly dry bark: The orchid may be ready for another watering. Check the moisture below the surface rather than relying only on the top bark chips.
- Bright green roots and damp bark: Wait before adding more water. Green roots are not an absolute measurement, but they can be a useful clue in clear pots.
- Soft, mushy roots: Inspect for root rot, particularly if the bark remains wet for many days. Improve drainage and replace decomposed potting material if necessary.
- Wrinkled leaves with dry roots: The plant may be dehydrated. However, wrinkled leaves can also result from damaged roots that can no longer absorb enough water.
In a typical apartment, checking the pot every five to seven days is a reasonable starting habit, although your actual watering interval may be shorter or longer depending on the season, bark, and container.
When the orchid needs water, take the inner pot to the sink and run room-temperature or tepid water through the bark until everything is evenly moistened. Let the excess drain completely before returning the pot to its decorative container.
Never leave the inner pot standing in a pool of water. If water collects where the leaves meet in the center of the plant, blot it away to reduce the risk of crown rot.
The University of Maryland Extension recommends an airy bark medium and careful moisture management to protect Phalaenopsis roots.
One simple habit helps in small apartments: lift the nursery pot before and after watering. Over time, you will recognize the weight difference between freshly watered bark and bark that is almost dry.

6. Feed Lightly and Refresh Old Potting Bark
Orchids can grow in surprisingly small containers, but their potting medium and nutrients still matter.
Bark-based orchid mixes contain relatively little available nutrition. During active growth, a modest amount of fertilizer helps support the development of healthy leaves and roots that can later sustain flowering.
For a beginner-friendly routine, use a commercial orchid fertilizer according to its label, starting with a dilute solution if the product allows it. Feeding every third or fourth watering during active growth is a useful approach recommended by the University of Maryland Extension.
Reduce or pause fertilizer during periods of very low light or little active growth. More fertilizer does not automatically produce more flowers. Excessive feeding can damage roots and encourage leafy growth without improving flowering.
Know When to Repot
Phalaenopsis orchids commonly need fresh bark approximately every one to two years, although the condition of the medium matters more than the calendar.
Repot if the bark has broken down into fine, soggy material, drainage has deteriorated, or many roots have become rotten. The appearance of healthy aerial roots alone is not a reason to repot.
Choose a clear, well-draining orchid pot approximately the same size as the existing root system, or only slightly larger. Many household moth orchids grow comfortably in pots around 4–6 inches wide.
Remove loose, decomposed bark and trim roots that are clearly dead or mushy with clean scissors. Leave firm roots intact, even when they look pale or silver.
Use a commercial orchid bark mix rather than standard moisture-retentive potting soil. Avoid adding a gravel layer beneath the bark; good drainage comes from suitable medium and drainage holes, not stones at the bottom.
Repotting is generally easiest when the orchid is starting new root growth. If your plant is otherwise healthy, there is no need to disturb it simply because the flowers have finished.

7. Find Out Why Your Orchid Still Won’t Bloom
Sometimes an orchid looks perfectly healthy but does not produce new flower spikes for months.
That does not necessarily mean you are doing something wrong. A healthy Phalaenopsis may follow a flowering cycle lasting around a year, although certain hybrids can flower more frequently.
If your plant has gone through a full growing cycle without showing signs of flowering, use these clues to decide what to change.
- Healthy leaves, no flower spike: Review light exposure first. Move the plant gradually into brighter filtered light, then consider a cooler nighttime period if it is otherwise healthy.
- Very dark green leaves: Insufficient light may be limiting flowering. An east-facing window or suitable grow light may help.
- Wrinkled leaves and soft roots: Investigate root problems before changing temperatures or adding fertilizer. Correct drainage and watering first.
- Buds develop but fall before opening: Look for sudden temperature changes, drafts, moisture stress, and nearby heating vents. Keep the plant’s environment steady.
A plant that has just been repotted or is recovering from root damage may need additional time to establish healthy growth.
University of New Hampshire Extension notes that healthy orchids may rebloom roughly a year after their previous flowering began. That is a useful reminder not to expect immediate results from every change in care.
When I am troubleshooting a reluctant houseplant, I prefer changing one major condition at a time. Moving an orchid, increasing fertilizer, repotting, and changing its watering schedule all in the same week makes it difficult to know what helped and what caused stress.
Start with the simplest fix that matches the symptoms, then observe the plant for several weeks.

8. Common Mistakes to Avoid When Encouraging Flowers
The biggest reblooming problems usually come from a few everyday habits rather than an obscure orchid disease.
One mistake is leaving a moth orchid in a decorative pot without checking whether water has collected inside. Even if the nursery pot has drainage holes, roots can remain waterlogged when the outer container holds excess water. Empty the cachepot after every watering.
Another common mistake is placing orchids in direct summer sunlight to make them flower faster. More light can help, but scorched leaves cannot provide the same energy as healthy ones. Introduce brighter conditions gradually and filter harsh afternoon sun.
Overfeeding is another temptation. If flowers do not appear, doubling the fertilizer dose may seem reasonable. In practice, it can damage roots. Stick to the product label and feed lightly during active growth.
I also see people give up on orchids shortly after their blossoms disappear. Some plants spend months producing roots and leaves before the next flowering cycle. That quiet growth is useful, even if it is not especially exciting to look at.
Finally, avoid trying to force flowers on a severely stressed plant by exposing it to cold conditions. Check root health first, and keep Phalaenopsis protected from temperatures below approximately 60°F.
For apartment gardeners with cats or dogs, there is one reassuring detail: the ASPCA lists Phalaenopsis orchids as non-toxic to cats and dogs. Still, keep fertilizers out of reach and discourage pets from chewing plants, since swallowed plant material can cause stomach upset.
9. Recognize a New Flower Spike and Protect Its Buds
One of the most satisfying moments in orchid care is spotting a small green growth between the leaves. But is it a new root or the beginning of a flower spike?
New Phalaenopsis roots usually have rounded tips, often green when actively growing, with silvery material developing behind the tip.
A new flower spike often emerges from between the leaves with a flatter, more pointed tip. As it grows, small joints and bracts become visible along the developing stem.
It may take several weeks before the difference becomes obvious, so resist the urge to touch or manipulate tiny new growth.
Care for the Orchid Once a Spike Appears
Continue providing bright, filtered light and water whenever the bark approaches dryness. Avoid suddenly increasing fertilizer or moving the plant into direct sunlight.
When the developing spike reaches approximately 4–6 inches long, you can begin guiding it gently along a thin support stake if necessary. Fasten it loosely with orchid clips, and avoid forcing a stiff or curved spike to straighten.
Once buds form, keep the plant away from cold drafts, heating vents, and abrupt changes in temperature. Consistent conditions are especially important at this stage.
A new spike does not mean flowers will open immediately. Depending on the plant and growing conditions, development can take weeks to several months.
For a small apartment, I like choosing a bright location where an orchid can remain undisturbed once its buds are developing. It saves repeated moving, makes watering easier to monitor, and reduces the chance of accidentally breaking a tender stem.

A Simple Plan for Your Orchid’s Next Bloom
Getting an orchid to bloom again is less about finding a special trick and more about providing the conditions that help the plant grow well between flowering cycles.
Start with the basics. Check the roots and remove any completely dry flower spikes. Give your orchid a bright location away from harsh summer sunlight, then water when its bark is nearly dry rather than following a rigid schedule.
Once the plant is healthy and growing steadily, try providing cooler nights for approximately three to four weeks. For many Phalaenopsis orchids, that seasonal temperature difference can be the missing signal that encourages a new flower spike.
Be patient with the results. A secondary branch may develop on an existing green spike, while a completely new spike can take much longer. Some orchids bloom again relatively quickly; others follow a more seasonal cycle.
My favorite part of growing orchids in small spaces is that their progress often appears in tiny details: a new root tip, a firm young leaf, or a small pointed spike emerging from the crown.
Those are the signs worth watching.
Give your orchid a little attention each week, resist unnecessary changes, and let healthy growth do the work. With time and the right conditions, that bare stem and cluster of green leaves can become another beautiful display of flowers.