If you’ve ever grown a sunflower in a pot on a balcony, you already know the funny part: the flower is huge and confident, and then the seeds act like they’re trying to quietly disappear. One windy day, a few curious birds, and suddenly your “I’ll harvest this later” plan turns into a scavenger hunt.
This guide walks you through how to harvest sunflower seeds without drama—when to cut the head, how to dry it in a small apartment-friendly setup, and how to prep seeds for two different goals: saving for next season or roasting for eating. I’ll keep it practical and specific, with little cues you can actually see and feel (like what the back of the head should look like, and how dry is “dry enough”). By the end, you’ll know how and when to harvest sunflower seeds, and you’ll have a simple routine that works whether you’re growing one dwarf sunflower in a 5-gallon container or a row of giants in a community garden plot.
Know When Sunflower Seeds Are Ready to Harvest
The biggest secret to harvesting is timing: cut too early and you get pale, lightweight seeds that don’t store well; wait too long and birds (or a rain spell) can take their cut first.
Look for a few cues happening together:
- The back of the flower head changes color from green to yellow and then toward brown/dry.
- The petals are mostly dry and falling away, and the head often droops down.
- The seeds look plump and have their mature color pattern (often dark with lighter striping, depending on the type).
If you’re the “just check it tomorrow” type (I am), do yourself a favor and pull a couple seeds as a test. Mature seeds feel firm and filled—more like a solid shell than a soft, hollow bead. Kansas State University Research and Extension notes that checking seed color and the head’s backside shifting to a lemon-yellow stage are strong maturity indicators.
One more timing tip for balcony growers: wind can rattle seeds loose earlier than you expect. If the head is starting to dry and you’re noticing seeds loosening, it’s better to cut and finish drying indoors than risk losing half of them in a gust.
| What You See | What It Means | What To Do |
|---|---|---|
| Back of head still green; petals mostly present | Not ready yet | Wait, but start watching for birds |
| Back of head yellowing; head drooping; florets drying | Close to maturity | Cover the head to protect seeds and prevent drop |
| Back of head brown and dry; petals mostly gone; seeds plump | Harvest window | Cut the head and dry it in a breathable bag |

Protect the Head Before You Cut It (So Birds Don’t Harvest First)
The moment seeds start to ripen, birds notice. On a balcony, that can happen fast—your sunflower is basically a billboard at rooftop level.
Once petals begin turning brown and the head is moving toward maturity, cover it:
- Paper bag method: Slip a paper sack over the head and secure it loosely with a rubber band or twine.
- Cheesecloth method: Wrap cheesecloth or a breathable mesh and tie it snugly at the stem.
- Perforated bag option: If birds are relentless early, a perforated plastic bag can work short-term, but don’t trap moisture—airflow matters.
K-State Extension specifically recommends covering heads as they ripen to keep birds out and keep seeds from dropping during drying and handling.
Beginner mistake I see a lot (and yes, I’ve done it): using a fully sealed plastic bag “just for a day.” If you get cool nights or foggy mornings, that trapped humidity can push the head toward mold. If you must use plastic, make sure it’s perforated and switch to paper or cloth as soon as you can.
Cutting and Harvesting: Two Methods That Actually Work in an Apartment
I remember the first time I tried to harvest seeds on my apartment balcony—I rubbed the head with my hands like I’d seen online, and a surprise gust turned it into a seed confetti situation. After that, I started doing everything over a bowl or inside a bag, and life got calmer.
Here are two solid approaches. Pick the one that matches your space and patience level:
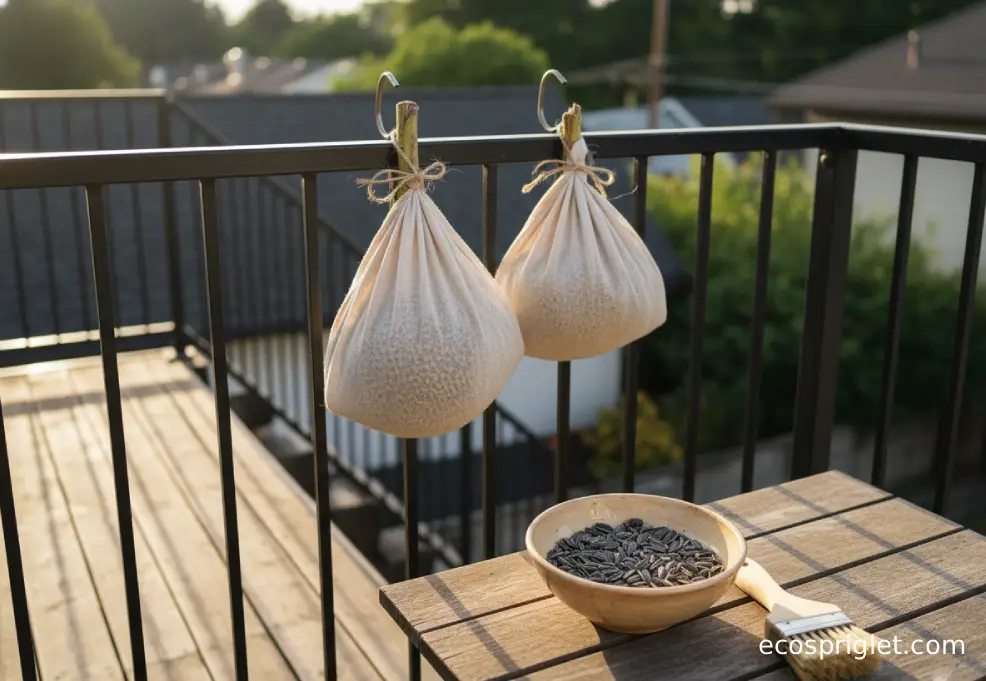
Method 1: Bag-and-Rub (my go-to for small spaces)
- Cut the head with about 12 inches of stem if possible so you have something to hold or hang.
- Place the head in a large paper bag (or keep it wrapped in cloth).
- Once the head is dry, rub the seed face firmly with your fingers or a clean stiff brush. Seeds fall into the bag.
Method 2: Hang-and-Knock (great if you can hang in a dry corner)
- Hang the head upside down in a warm, dry spot with airflow (laundry area, airy closet, covered balcony corner).
- Keep a cloth bag tied around it to catch drops.
- After drying, knock the head gently against the inside of a clean bin or bowl to release seeds.
Michigan State University Extension describes hanging the head upside down in a warm, dry place with good air circulation and then removing seeds by knocking or rubbing.
If you want the cleanest harvest (less chaff), do a quick “first pass” rub, then pick out the worst debris, then do a second rub. It’s oddly satisfying—and you end up with fewer bits stuck in your teeth later if you’re roasting. Also, if you see lots of empty shells, K-State Extension notes that can point to pollination issues earlier in the season (common on windy high balconies where pollinators are scarce).
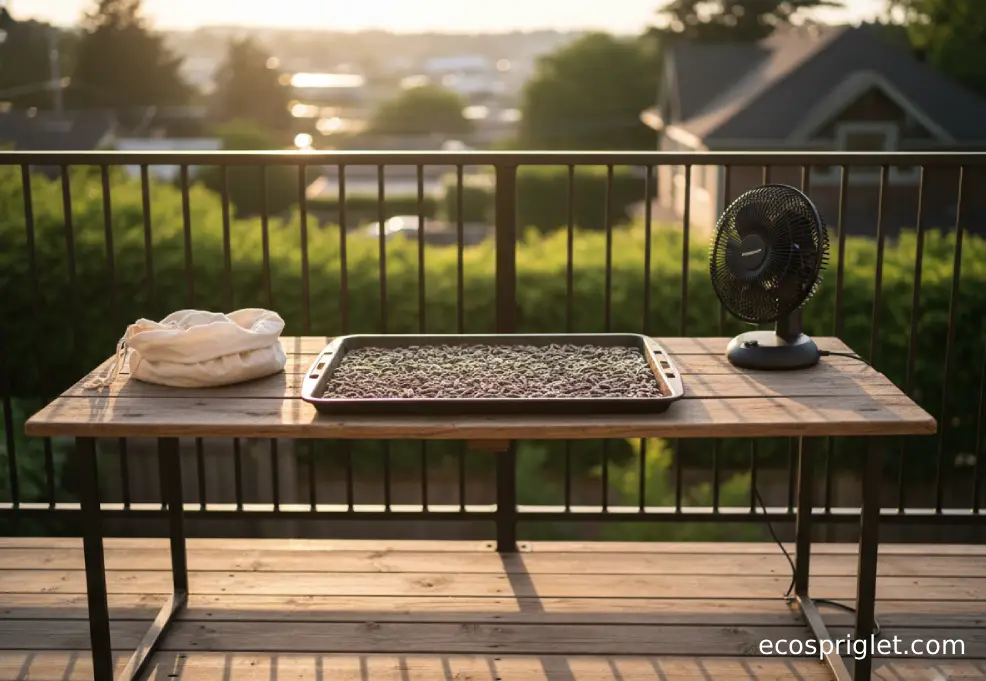
Drying and Curing the Seeds So They Don’t Mold
Drying is where most home harvests go sideways—especially in apartments where air can be humid and still. Your goal is simple: get everything dry enough that seeds store without turning musty.
A reliable routine looks like this:
First, dry the whole head. Cut the head with a bit of stem and hang it upside down in a dry location with good air circulation, with a cloth bag tied around it to catch seeds.
Then, after you remove the seeds, spread them out in a single layer on a tray or baking sheet for a final dry. In my place, I give them a few days on a tray near a bright window (not in direct sun) and I stir them once or twice a day. If your home runs humid, a small fan across the room (not blasting directly) helps.
Don’t rush the finish line. Both Michigan State University Extension and Colorado State University Extension emphasize making sure seeds are fully dried before airtight storage.
Quick “dry enough” test: a fully dried seed shell feels hard and crisp; a damp one feels slightly flexible. If you’re getting any tacky feel or a faint grassy smell when seeds sit piled up, keep drying.
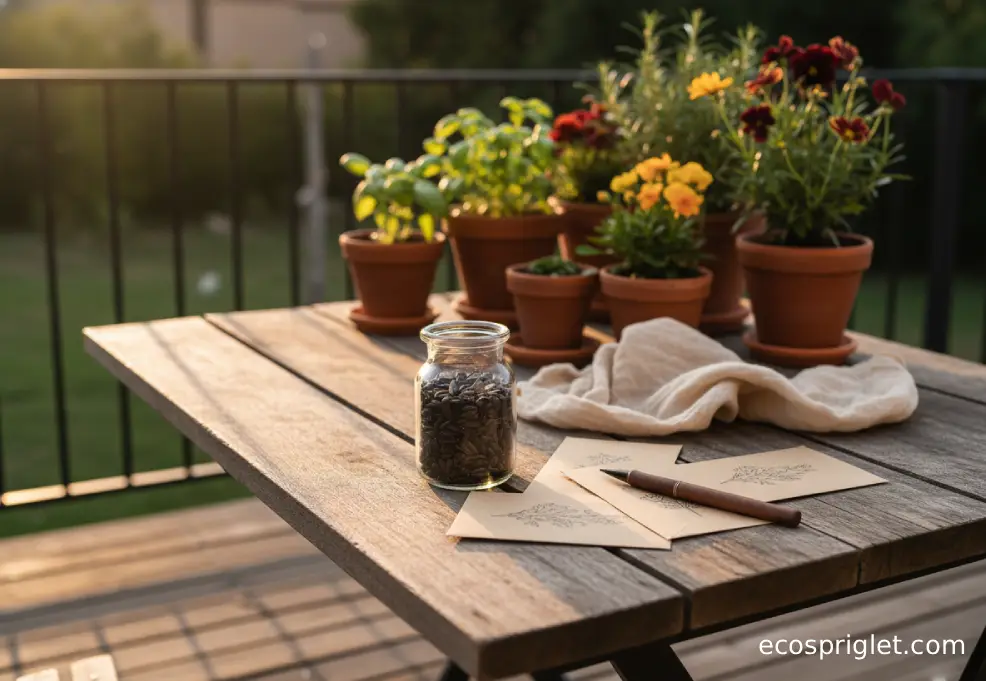
How to Harvest Sunflower Seeds for Planting Next Year
If your goal is saving seed, think “best genetics, best dryness, best labeling.” You’re not just collecting seeds—you’re choosing next year’s plants.
- Pick your best head: Choose a sunflower that stayed healthy (no mildew, no major pest damage) and made plenty of fully filled seeds.
- Dry thoroughly: Home-harvested seeds need to be truly dry before sealing them up, or they can spoil in storage.
- Store cool and dry: The refrigerator is a solid option if seeds are in a sealed container and truly dry.
- Label like future-you is busy: Write the variety (if you know it), color, height estimate, and the year.
South Dakota State University Extension highlights humidity control as the most important storage factor and notes that refrigeration can extend storage life, as long as seeds are sealed and you avoid condensation.
University of Minnesota Extension adds a handy target: keeping saved seeds cool and dry, with 32° to 41°F being an ideal storage temperature range (a fridge fits that). They also suggest desiccants like silica gel to help manage moisture.
One small-space tip: if you store seeds in the fridge, let the sealed container come to room temperature before opening it. Otherwise, moisture in the air can condense right onto your seeds.
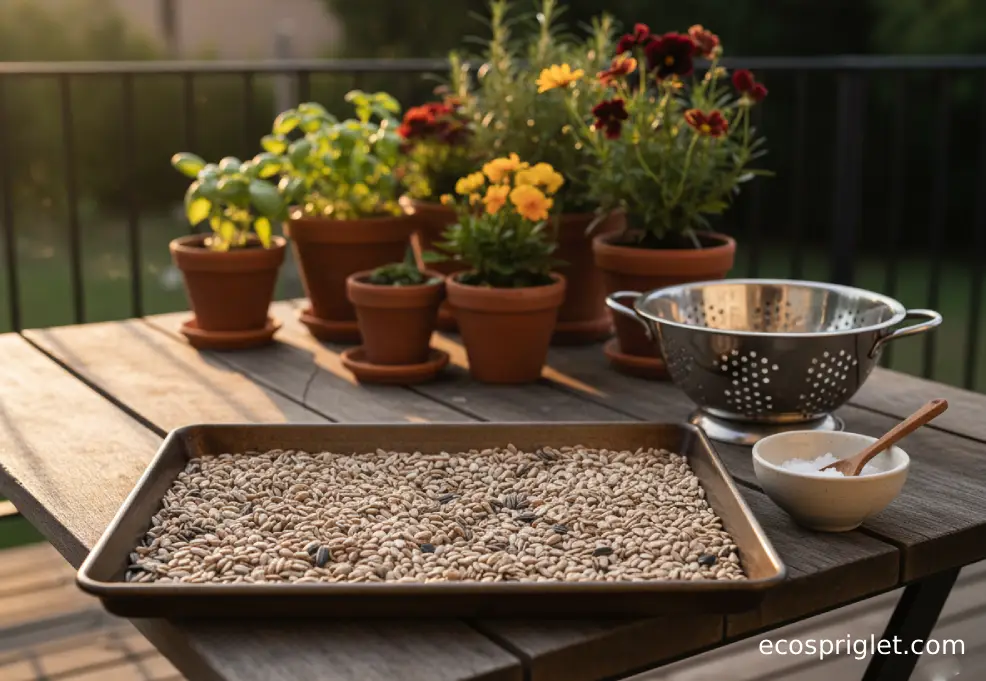
How to Harvest Sunflower Seeds for Eating (Cleaning, Salting, Roasting)
For eating, your priorities are flavor and shelf life. That starts with removing debris and drying well, then deciding whether you want plain or salty roasted seeds.
Cleaning (fast and apartment-friendly): After you rub seeds free, winnow them by pouring slowly from one bowl to another in front of a gentle fan or open window—light chaff blows away, heavier seeds drop in. If you rinse seeds, dry them thoroughly afterward (rinsing is fine, but wet seeds + storage is where trouble starts).
Salting option
Oregon State University Extension suggests soaking sunflower seeds in a salt solution of about 2 teaspoons (or more) of salt per quart of water for 24 hours before drying.
Roasting option (pick one):
- Quick roast: Roast at 300°F for about 10–15 minutes, stirring frequently, then cool completely.
- Steadier roast: Roast at 300°F for about 15–25 minutes, especially if seeds are larger or still slightly moist, and start checking early.
- Lower and slower: Roast at 250°F for about 1 hour (or 275°F for about 30 minutes), stirring often, for a gentler dry-and-toast.
Let roasted seeds cool fully before sealing them. OSU Extension notes that for longer keeping, refrigeration or freezing helps prevent seeds from going rancid at room temperature.
If you’re setting up a snack station on a balcony table (highly recommended), pair roasted seeds with something fresh and simple—chopped tomatoes, a squeeze of lemon, and a pinch of salt—and you’ve got a genuinely good apartment dinner side.
Common Mistakes New Balcony Gardeners Make
- Harvesting too early: If the back of the head is still green and seeds look thin, wait. Immature seeds don’t store or roast as well.
- Forgetting bird protection: Cover heads as they ripen, especially on balconies where birds have easy access.
- Using sealed plastic and trapping moisture: Breathable coverings (paper, cloth, cheesecloth) are safer than airtight plastic.
- Storing seeds before they’re fully dry: This is the classic mold/rancid trigger—dry first, then seal.
- Opening cold-stored seeds right away: If seeds are refrigerated, let the container warm up before opening to avoid condensation.
If you only fix one thing, fix drying. Almost every “why do my seeds smell weird?” question comes back to moisture trapped in a container.
Creative Ways to Use Sunflower Heads and Extra Seeds
If you grew more seeds than you can reasonably snack on (it happens), don’t let them sit forgotten in the back of a cabinet.
A few easy, small-space-friendly ideas:
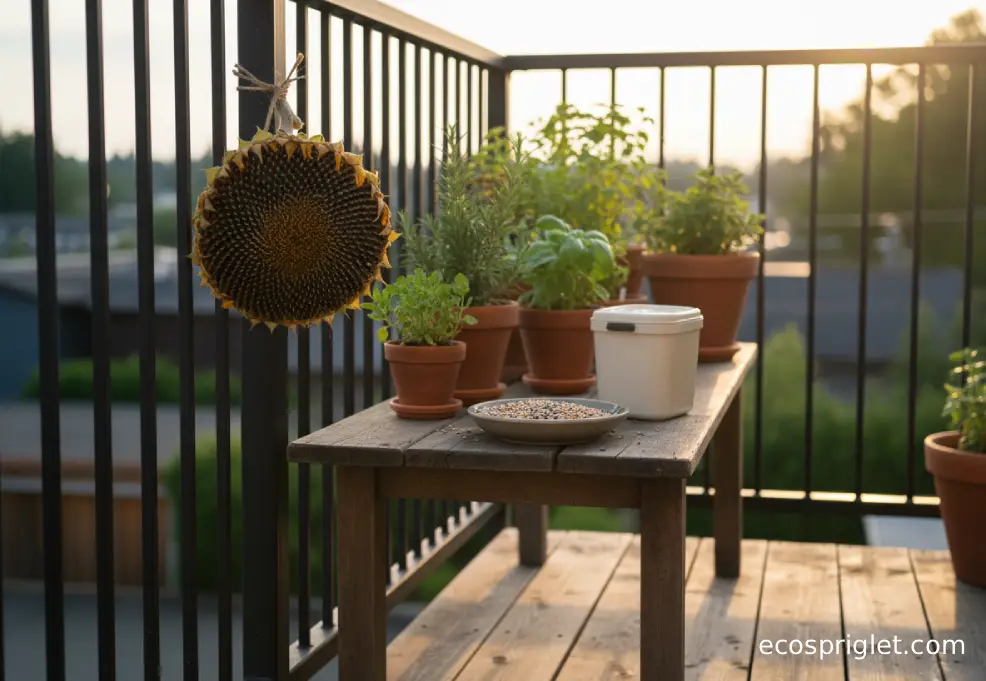
- DIY bird feeder: Hang a fully dried head outside for local birds (especially in winter).
- Kitchen topper: Sprinkle roasted kernels on salads, yogurt, or oatmeal for crunch.
- Compost the leftovers: Stems, spent heads, and chaff can go into compost (cut stems into shorter pieces first).
If composting on a balcony is new to you, Composting in Small Spaces covers odor control, bin sizing, and what to avoid so you don’t invite fruit flies.
Quick Wrap-Up: A Simple Harvest Routine You Can Repeat
If you remember nothing else, remember this: harvest when the head is drying down (yellowing to brown on the back), protect it before birds do, and dry seeds completely before you seal them up. That’s the core of how to harvest sunflower seeds successfully—whether you’re saving them for planting or prepping a batch to roast.
My favorite small-space routine is: cover the head as petals brown, cut when the back is turning brown/dry, hang it in a breathable bag, rub seeds into a bowl, then tray-dry a few more days before storing. It’s tidy, it fits apartment life, and it keeps your harvest from turning into balcony bird food.