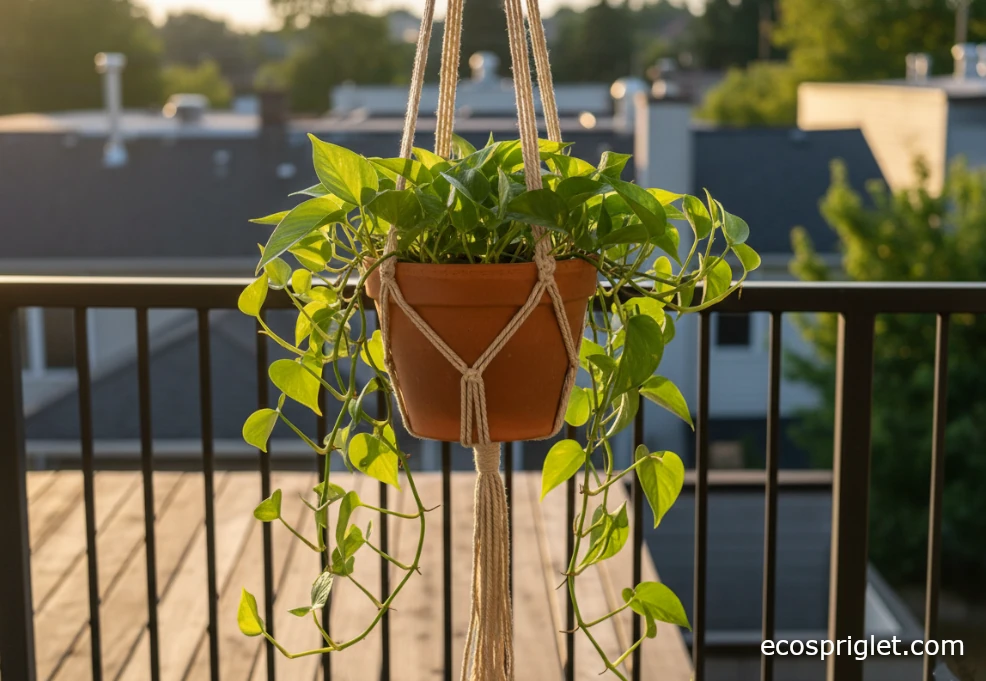
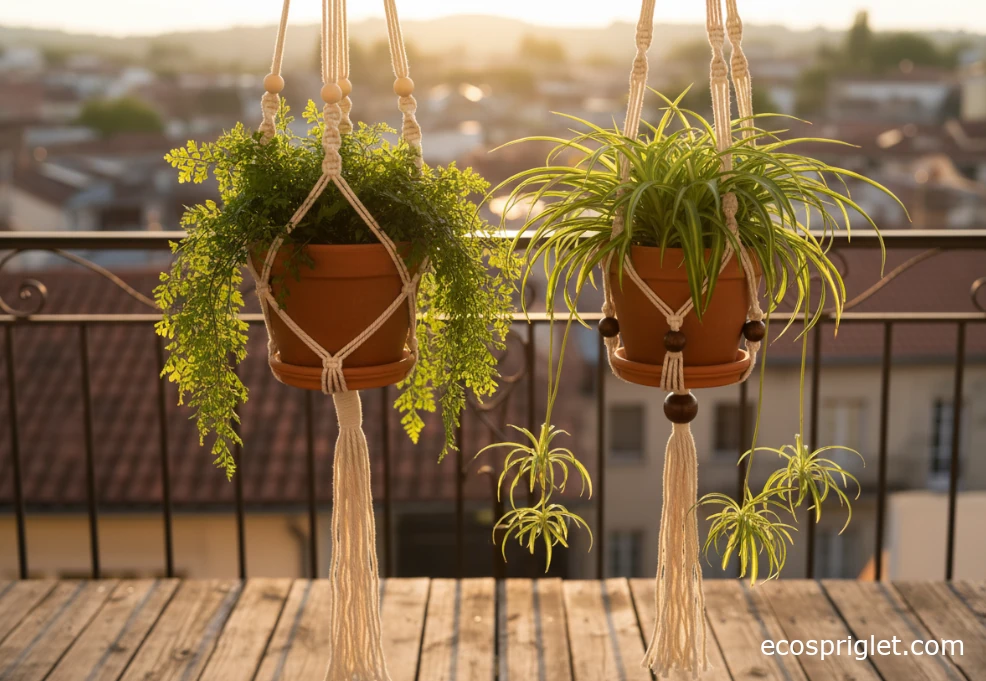
If you live in an apartment and your window sills are already jammed with pots, a macrame plant hanger DIY project is one of the easiest ways to add more green without giving up precious floor space. A simple DIY hanging planter turns that awkward corner by the window into a mini jungle, and you can make it with just some rope, a hook, and a bit of patience. I started tying DIY hanging plant holders years ago when my tiny Portland balcony ran out of room, and those first wobbly macrame knots are still holding plants today.
In this guide, I’ll walk you through everything you need to make a diy macrame plant hanger that actually supports your pot, looks good from below, and doesn’t drip all over your neighbors. We’ll cover cord types and sizes, the basic knots, a step-by-step beginner pattern, how to fit different pots, and how to care for the plant once it’s hanging. Along the way, I’ll share the mistakes I made—like cutting cords way too short—so your first DIY hanging plant macrame project can go a lot smoother.
Why Make a Macrame Plant Hanger at Home
Macrame plant hanger DIY projects are perfect for renters and small-space folks because they add vertical greenery without putting holes everywhere or buying big shelving units. A single diy hanging planter can turn dead air space in front of a bright window into the best seat in the house for a plant. If you choose a neutral rope and a simple pattern, it works with just about any decor—from boho to super modern.
There’s also a practical side: a plant hanger diy lets you customize the drop length, pot size, and number of cords so you’re not trying to cram a wide terracotta pot into a hanger that was clearly made for a tiny plastic nursery pot. Once you’ve made one diy rope plant hanger, it becomes very easy to tweak the knot spacing for taller plants, heavier pots, or a different ceiling height. Plus, tying knots is surprisingly relaxing; I’ve ended more than one stressful workday just standing on the balcony, tightening square knots while the city buzzes below.
And unlike store-bought hangers, you know exactly how your diy macrame plant hanger was made and what materials are holding your favorite philodendron or spider plant. That matters when you’re hanging something over a couch, a desk—or a glass coffee table.
Tools and Materials for a Macrame Plant Hanger DIY
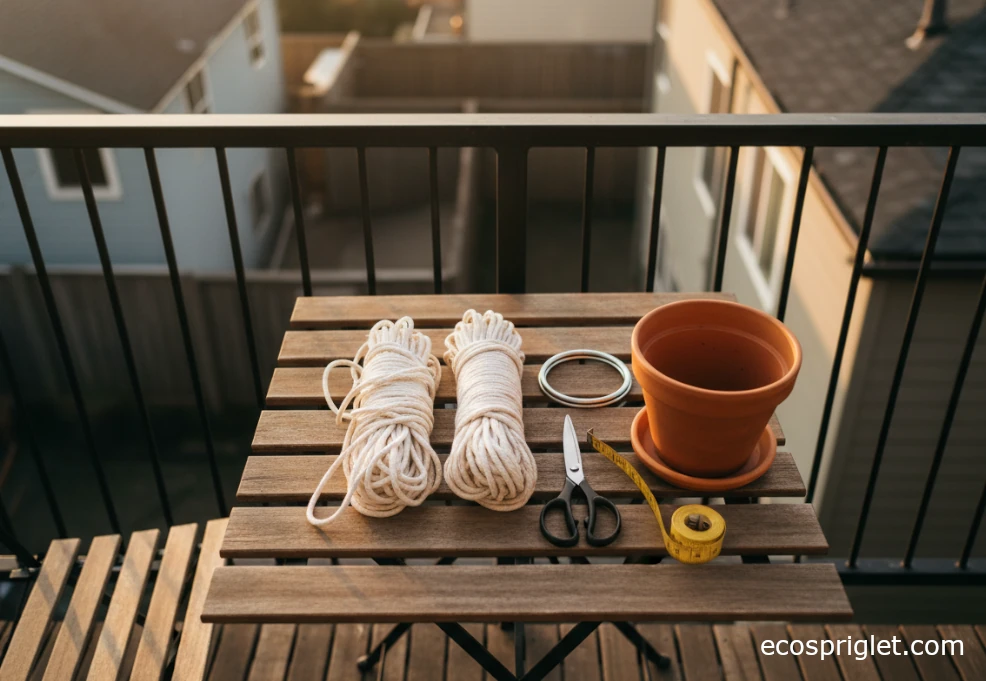
Before you tie a single knot, it helps to gather everything for your plant hanger diy in one place. The good news: you don’t need fancy tools—just the right kind of rope and a sturdy spot to hang your work while you tie.
- Macrame cord or rope: Natural cotton cord in the 3–5 mm range is ideal for most diy hanging planter projects; thicker cord gives a chunkier look and can feel sturdier for heavier pots.
- Hanging ring or loop: A wooden or metal ring works great; you can also create a loop directly from the cords with a wrapping (gathering) knot.
- Scissors and tape measure: Sharp scissors are your best friend here, along with a tape measure for cutting equal lengths.
- Hook or anchor: A ceiling hook, wall bracket, or heavy-duty plant hook rated for more than the weight of your pot, soil, and water combined.
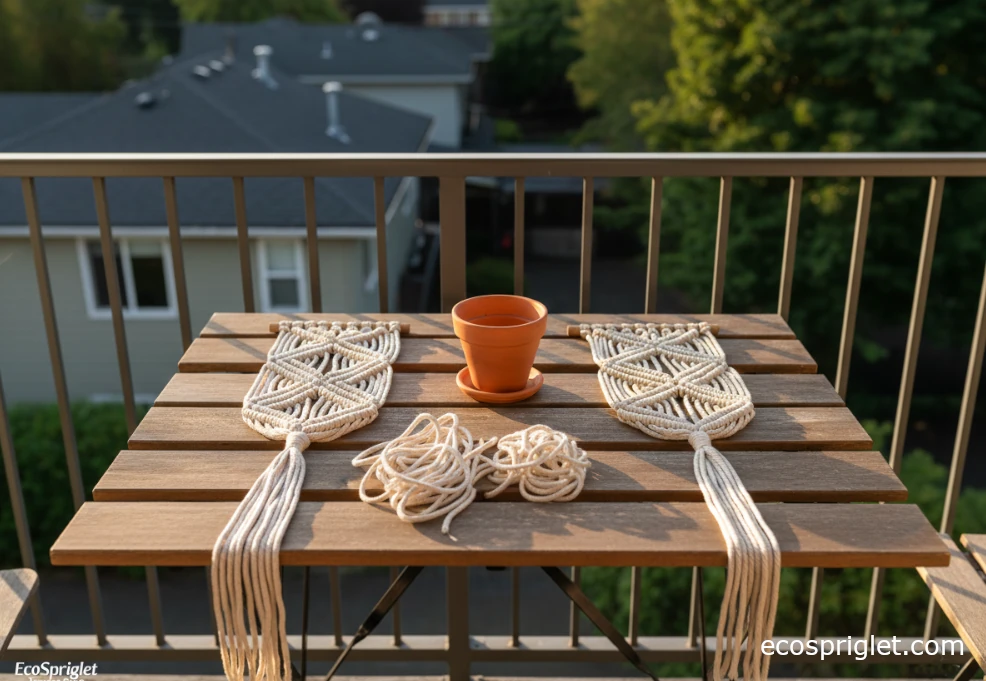
For a simple diy macrame plant hanger around 30–36 inches long, many makers cut their cords roughly 3–4 times the desired finished length. So if you want a 3-foot hanging plant holder, cords in the 10–12 foot range are usually plenty for a basic pattern with a few decorative sections. It’s always better to cut a bit longer than to end up with cords that are too short for the final knot.
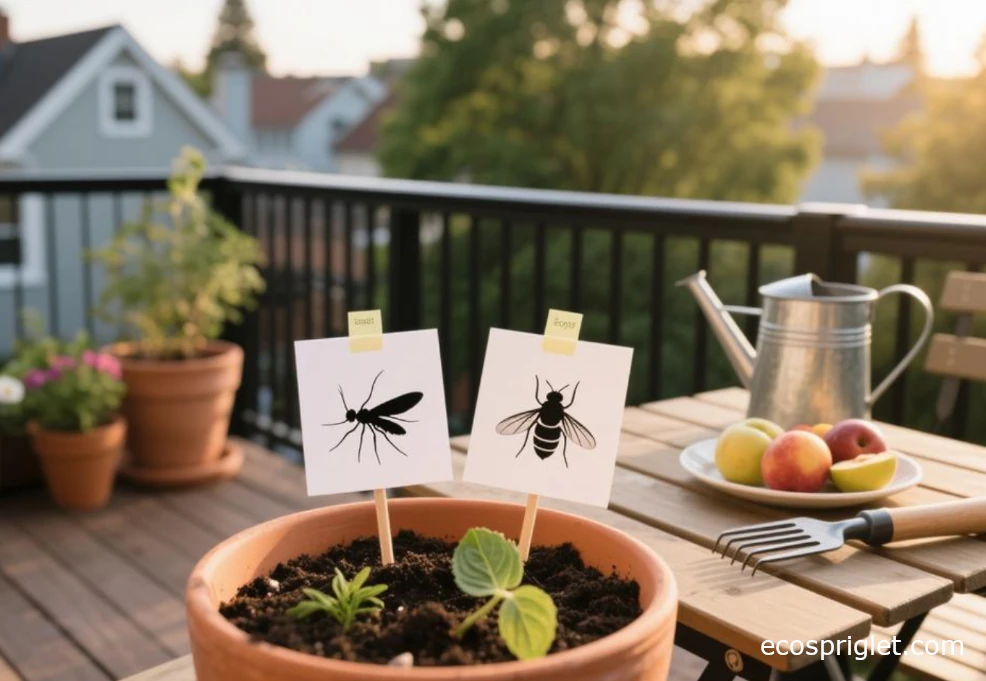
If you’re hanging outside, consider how much sun and rain the rope will see. Cotton is great indoors; for more exposed balconies, some crafters switch to weather-tough options like paracord or synthetic clothesline for outdoor diy hanging planter rope. Whatever you choose, pair the rope with a solid anchor and a pot that has drainage holes plus a saucer or inner pot to catch extra water.
Learn the Core Macrame Knots for Plant Hangers
You don’t need a library of fancy knots to pull off a diy macrame hanging plant—three or four basics will carry you through most patterns. I still use the same core knots I learned on my first weekend with macrame, and they’re more than enough to make a simple, beautiful diy hanging plant holder.
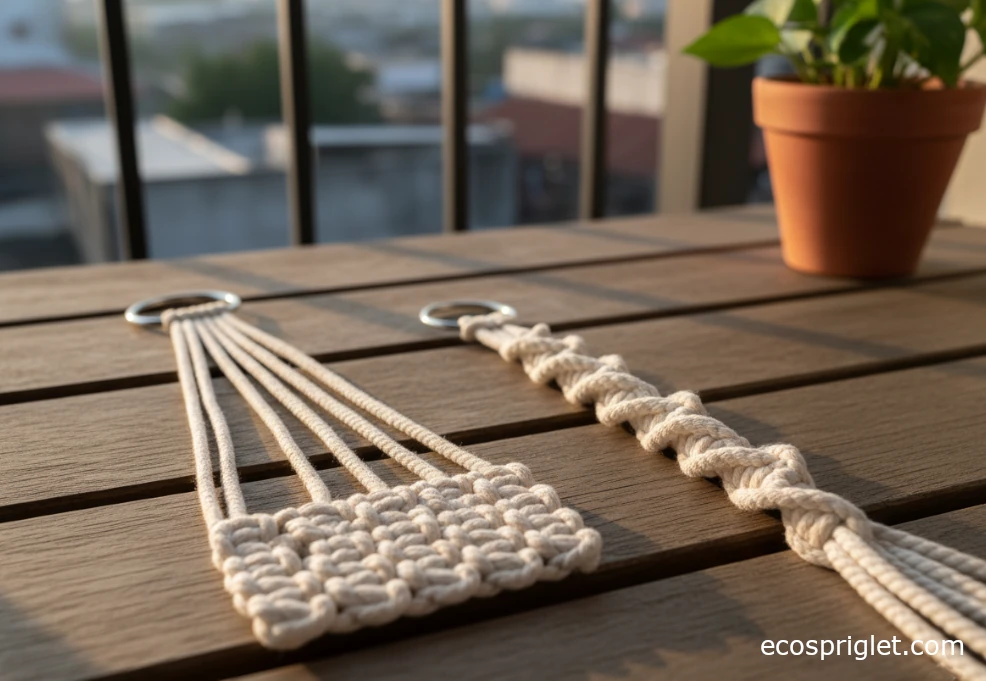
Start with the lark’s head knot, which is what attaches your working cords to the ring or top loop. Then learn the square knot; it’s the workhorse knot you’ll use to create decorative sections and the cradle that holds your pot. Tie several in a row and you’ll get a neat, flat band. If you repeat only one side of the square knot over and over, the band naturally twists into a spiral (half square) knot, which adds a nice ropey texture.
The last knot you’ll use a lot is the gathering knot (also called a wrapping knot). This is what pulls all the cords together at the bottom of the hanger and sometimes at the very top. Once you get comfortable with those four—lark’s head, square, spiral, and gathering—you can decode most beginner diy macrame plant hanger patterns you see online.
I like to practice new knots on a short scrap of cord before committing to the “real” project. Tie 6–8 inches of square knots, then undo them and try again until your tension looks consistent.
Step-by-Step: Simple DIY Macrame Plant Hanger
Here’s a straightforward macrame plant hanger DIY you can finish in an afternoon. It uses just square knots and a gathering knot, and works well for medium pots (about 6–8 inches across).
- 1. Cut your cords. For a hanger around 34–36 inches long, cut 4 pieces of cord about 10–12 feet each and fold them in half so you have 8 working strands. Cut one extra piece around 3–4 feet long for the final gathering knot.
- 2. Attach to the ring. Fold each long cord in half and attach all four to your ring using lark’s head knots. You should now see 8 strands hanging down.
- 3. Make a top decorative band. About 2–3 inches below the ring, divide the cords into groups of four and tie 6–10 square knots in each group to form a neat band.
- 4. Create the “stems.” Leave a gap of 3–4 inches, then tie another 4–6 square knots in each group. These stems will run down toward your pot.
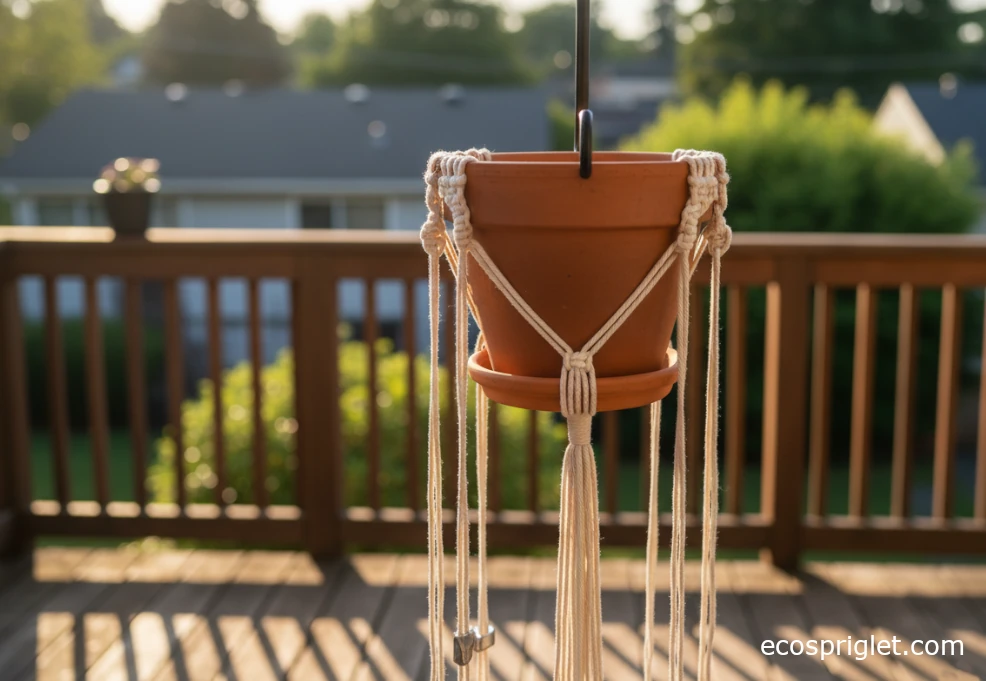
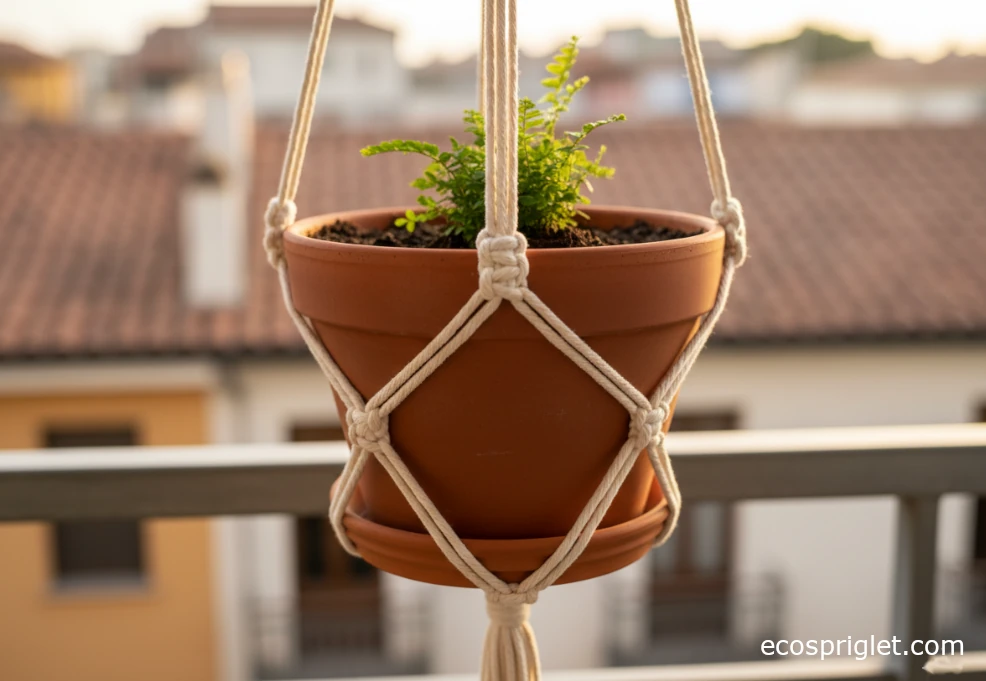
- 5. Form the cradle. Slip your empty pot into the cords to visualize where it will sit. About one pot-height below the last knots, start making “net” connections: take two cords from one group and two from the neighboring group and tie 1–2 square knots. Repeat all the way around. Leave another short gap and make a second round of net knots so the cradle closes up under the pot.
- 6. Finish with a gathering knot. Gather all cords neatly together 2–3 inches under the bottom of the pot and wrap them tightly with your shorter cord to make a gathering knot. Trim the tail ends into a tassel, or cut them shorter for a cleaner look.
- 7. Test the hanger safely. Hang your empty diy hanging planter rope on a sturdy hook first, then place your pot in and gently adjust the cords until it sits level.
I like to do the final test over a soft surface like a bed or a pile of folded towels. That way if something slips while you’re adjusting the cord tension, you’re not sweeping up potting mix at midnight. Once it looks balanced, you’re ready to pot up your plant or drop an existing potted plant into the hanger and move on to fine-tuning the fit.
Fitting Different Pots and Balancing Your DIY Hanging Planter
Getting the pot to sit level is the part that makes or breaks a diy hanging plant holder. The trick is to do most of your adjustments before there’s wet soil involved. I always test with the empty pot first, then again after adding soil and the plant.
If you’re working with a wider, shallower pot, space the cradle knots a bit farther apart vertically so the cords wrap around the “shoulder” of the pot and not just the bottom. For a tall, narrow pot, bring the first round of cradle knots up higher so the pot can’t slip through. Slight differences of 1–2 inches in gap spacing can make a big difference in how secure the pot feels.
When your plant is in place, stand back and look at the diy hanging plant macrame from a few angles. If the pot tilts, gently slide individual knots up or down to level it out instead of yanking on the cords. It’s slow, but it works. I find that hanging the planter near its final spot – like the actual balcony hook or a wall bracket—shows small balance issues that aren’t obvious when it’s hanging from a random door knob.
Finally, keep gravity and neighbors in mind: avoid placing very heavy ceramic pots in extremely long hangers unless your anchor and cord are genuinely up to the task. A lightweight terracotta or plastic pot paired with a compact plant is usually the safest choice for upper-story balconies and over-desk hangers.
Choosing Plants and Caring for Them in a Macrame Hanger
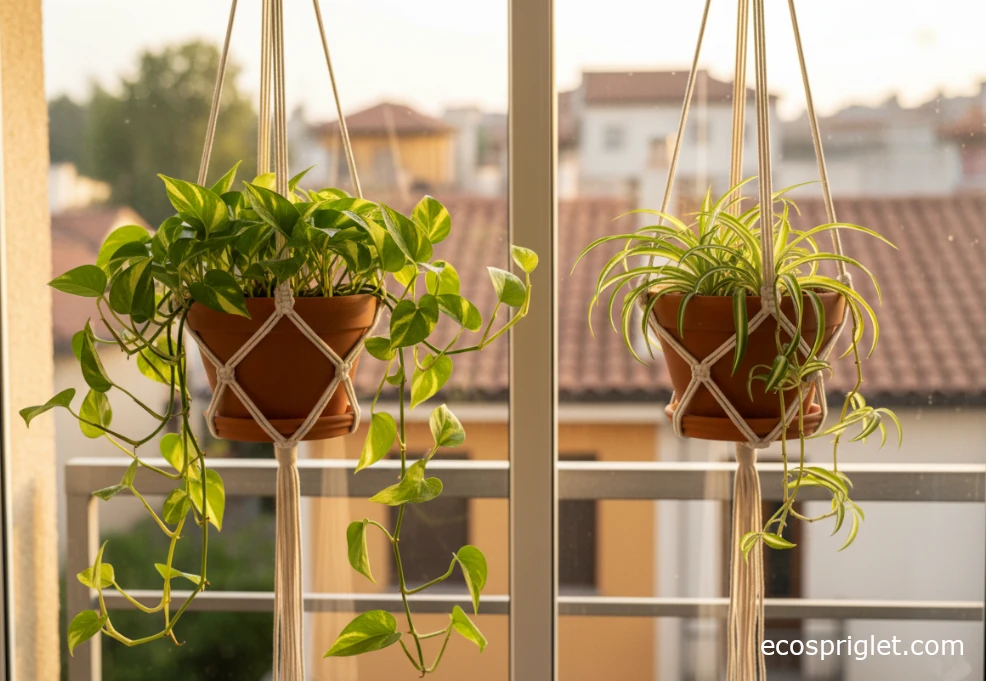
A diy macrame plant hanger is only as happy as the plant living in it. Hanging planters dry out faster and often get more light, so choosing the right plant and tweaking care a little makes a big difference.
Most people reach for classic trailers like pothos, philodendron, or spider plants because they naturally spill over the edge and soften the rope lines. Many common houseplants like these are pretty forgiving about light and water as long as you avoid extremes. University extensions like those from Nevada, Florida, and West Virginia recommend watering most houseplants when the top inch of soil feels dry, then watering thoroughly until excess drains from the pot. In a hanging pot, that often means checking moisture a little more often than you would for the same plant on a shelf.
Here are some simple rules that have served me well for plants in diy hanging planters:
- Use a pot with drainage holes, either as the main pot or nested inside a cachepot, so water doesn’t sit at the bottom and rot the roots.
- Aim for bright, indirect light for most leafy houseplants—near a bright window but not pressed against scorching glass.
- Water at the sink when possible, letting water run through freely, then let the pot drain completely before returning it to the hanger.
If you have pets, double-check that your chosen plant is non-toxic to cats and dogs using a database like the ASPCA’s before you hang it at paw or nose level. When in doubt, stick with pet-safer choices and place riskier plants out of reach.
Creative Variations for Your DIY Hanging Plant Holder
Once you’ve made one simple plant hanger diy, it’s very hard to stop at just one. Small changes in cord count, color, or knot pattern can make the next diy hanging plant holder feel totally different—even if you’re using the same basic steps.
- Change the thickness or color. Try a chunkier 5 mm rope for a bolder look, or soft gray/earth-tone cords to match your furniture.
- Add beads or rings. Wooden beads threaded onto select cords, or an extra ring mid-way down, add interest without complicating the knotting.
- Make a double or triple hanger. Use a longer ring section and stagger two or three cradles at different heights for a vertical plant “tower.”
- Play with spirals. Swap some of the straight bands of square knots for spiral sections to twist the cords gently around the pot.
- Experiment with dip-dye. Carefully dip just the tassel or the lower third of the cords in fabric dye to create a subtle ombre effect—ideally outside or in a well-protected sink.
I like to keep at least one diy macrame hanging plant in neutral cotton so it can move between rooms, and another in a bolder color that feels like a focal point on the balcony. It’s also a fun way to use up leftover cord from other projects—shorter pieces can often be turned into mini hangers for small nursery pots.
Common Macrame Plant Hanger Mistakes to Avoid
My first diy macrame plant hanger was so lopsided that the pot leaned like it was trying to climb out. The second one looked great—until I realized I’d cut the cords too short to tie a solid bottom knot. It still hangs on my balcony as a reminder to measure twice and cut once.
Here are a few common pitfalls to watch out for:
- Cutting cords too short. If you’re unsure, add at least an extra foot or two to your estimated cord length; you can always trim later, but you can’t stretch rope.
- Using very thin cord for heavy pots. Thin cord can be beautiful, but when you’re supporting a big pot full of wet soil, stepping up to a thicker cord (around 3–5 mm) or adding more strands is safer.
- Uneven knot spacing. Rushing through knots can make one “leg” shorter than the others. Check your gaps every few knots and adjust before moving on.
- Poor hanging hardware. A gorgeous hanger on a flimsy hook is asking for trouble. Make sure your ceiling hook or bracket is rated for more than the total weight it’s holding.
- Forgetting about water runoff. Water that drips straight off a hanging pot can stain the balcony below or your own floor. Always pair your diy hanging planter with a saucer or use a nursery pot nested inside a cover pot.
When something goes wrong, don’t be afraid to undo a few inches of knots and redo them. Macrame is surprisingly forgiving—cords can be untied and retied multiple times before they start to look tired. I’ve had evenings where I’ve reworked the same hanger three times while listening to rain hit the balcony railing, and the final version ended up much better for it.
By now you’ve seen how approachable a macrame plant hanger diy can be: a few basic knots, some well-chosen rope, and a bit of measuring are enough to turn empty air into green space. On a small balcony or by a sunny living-room window, even one diy hanging plant holder makes the whole corner feel more alive. The best part is that once you’ve tied your first hanger, you can easily tweak the pattern to fit new pots, different plants, or that slightly awkward ceiling height in the hallway.
As you gain confidence, experiment with new cord textures, mixed knot patterns, or multi-tier hangers that stack two or three pots vertically. Just keep an eye on plant needs—light, water, and pot size.
If your fingers are already itching to start another project, grab some extra rope next time you’re at the craft store and set up a small knotting station near your favorite window. You’ll end up with a matching set of diy macrame hanging plants before you know it, and your apartment will start to feel less like four walls and more like a treehouse.